in between battling a monstrous migraine this weekend I actually managed to get something done!
I got 5 different articles of clothing cut out for D for Estrella - which only comprises 2 outfits. But, it puts me so much farther in my process!
I'm very happy about this.
One of the outfits is a shaolin monk. It includes a new white cotton underrobe, orange linen crossover & "shants", and a brown cotton overrobe. Very Zen. :)
The other is another creation from the gorgeous silks that my mistress bought for me in China. The underrobe is a basic crossover with bell sleeves made of this brown silk that has a beautiful "chinese coin" detailing in it. And the over robe is a sleeveless crossover that is beige in base, with big embroidered medallions of dragons and such.
So, my goal is to get both of these outfits sewn this week, and then next weekend I can get D's last outfit and my outfit cut out, then sewn next week!
If I actually pull this off - I will be in SUCH good shape!
Showing posts with label SCA. Show all posts
Showing posts with label SCA. Show all posts
Sunday, January 21, 2007

Saturday, January 13, 2007
a busy little bee is me
SOOOO - the countdown to Estrella War is here, and I'm strangely calm. I've got one outfit done, another cut out, and am doing other little tasks in the interim.
First - the completed outfit. My SCA mistress did me the kindness of buying me and D countless yards of beautiful silks and actual silk brocades (as opposed to the polyester american imitations). This amazing treasure of fabric is being used to make a number of beautiful things, the first of which was a new Tang crossover for D - which he wanted before 12th Night last weekend. The result was:
 D is the cute boy on the left wearing his new red & gold Tang crossover. (as an aside - 12th night was a "masked ball" and the boys felt the need to make it a little more lively, hence the lucha masks - LOL)
I still need to finish making his belt that goes with the outfit. BUT, I have to say that there was a DISTINCT and OBVIOUS difference in sewing the chinese silk vs. the american cousin. It sewed so easily and beautifully. I have adapted my sewing style to accomodate US brocades and how they twist & fray - but NOT THIS STUFF! It is heavenly. I need another friend to go to china and buy me $300 worth of fabric!
One of my other Estrella tasks is to make a banner for the top of the NEW PAVILION THAT WE BOUGHT! (SQUEEE!) The friends we bought it from gave us all of their finnials to go atop each pole, and red pennant banners for all of them. But I thought that the one on the very top should be different - more individualized.
 So - again I'm silk painting golden monkeys! Being that this banner is only roughly 10 inches tall, but a very long pennant - I decided to spend $1.30 and get the largest needlepoint circle I could find. It has been MUCH easier to paint (compared to the monstrous thing I already made). I've already done the monkey - the body of the banner is red, but I'll probably do golden yellow edges. I'm very proud, and I hope it looks rockin on the pavilion.
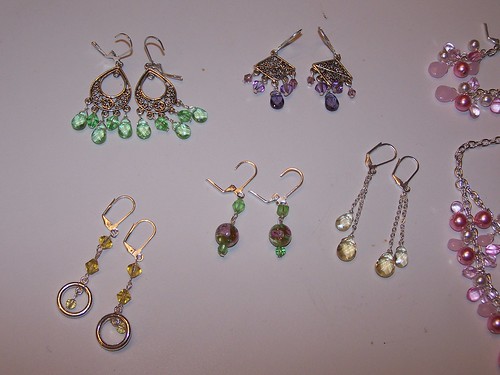
OK, THEN my INSANE self found these fabulous beading kits on clearance at Michael's, and I've already blown through 2 of them, with one more to go...
 THE EARRINGS
 THE SET
First - the completed outfit. My SCA mistress did me the kindness of buying me and D countless yards of beautiful silks and actual silk brocades (as opposed to the polyester american imitations). This amazing treasure of fabric is being used to make a number of beautiful things, the first of which was a new Tang crossover for D - which he wanted before 12th Night last weekend. The result was:
 D is the cute boy on the left wearing his new red & gold Tang crossover. (as an aside - 12th night was a "masked ball" and the boys felt the need to make it a little more lively, hence the lucha masks - LOL)
I still need to finish making his belt that goes with the outfit. BUT, I have to say that there was a DISTINCT and OBVIOUS difference in sewing the chinese silk vs. the american cousin. It sewed so easily and beautifully. I have adapted my sewing style to accomodate US brocades and how they twist & fray - but NOT THIS STUFF! It is heavenly. I need another friend to go to china and buy me $300 worth of fabric!
One of my other Estrella tasks is to make a banner for the top of the NEW PAVILION THAT WE BOUGHT! (SQUEEE!) The friends we bought it from gave us all of their finnials to go atop each pole, and red pennant banners for all of them. But I thought that the one on the very top should be different - more individualized.
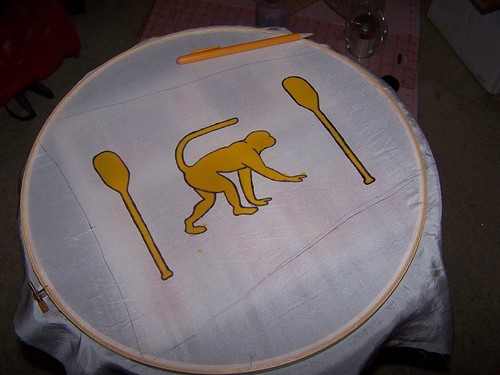 So - again I'm silk painting golden monkeys! Being that this banner is only roughly 10 inches tall, but a very long pennant - I decided to spend $1.30 and get the largest needlepoint circle I could find. It has been MUCH easier to paint (compared to the monstrous thing I already made). I've already done the monkey - the body of the banner is red, but I'll probably do golden yellow edges. I'm very proud, and I hope it looks rockin on the pavilion.
OK, THEN my INSANE self found these fabulous beading kits on clearance at Michael's, and I've already blown through 2 of them, with one more to go...
THE KIT
 THE EARRINGS
 THE SET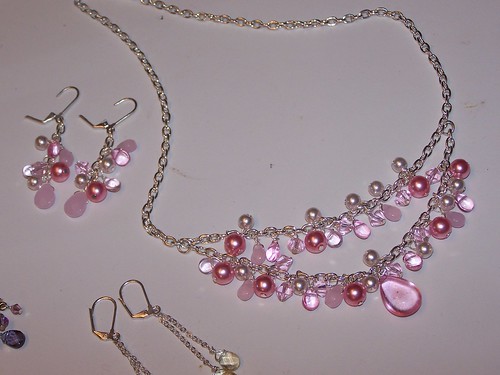
See - I'm insane. Yet, doing all this has kept me busy, and kept my mind calm.
I have tons more to do, and will do my best to keep posting my processes and the fruits of my labor.
I have tons more to do, and will do my best to keep posting my processes and the fruits of my labor.
Tuesday, August 29, 2006
it's not easy being green v.2.0! better! faster!
so, contrary to my last post - I finished filling in my banner design with the first round of dye-na-flow paints on sunday afternoon/evening. I was worried that I had to let the gutta rest for 24 hours before painting, but apparently 45 minutes is long enough, and I had already waited about 2 hours.
The yellow filled in beautifully, but the red I'm a little worried about. you can see my paint streaks, and i'm concerned that they won't wash or fade out. I'm going to go in for a 2nd coat to make sure the color is bright, and hopefully I can counteract the paintlines with the 2nd coat.
last night I cut out my Tang dress out of a beautiful green cotton gauze, and I finally found my overcoat fabric at Joann's. for once - something I needed WASN'T on sale, so I was actually able to use one of those 50% off coupons they send twice a month via mail & email. It worked out well too, because the sheer fabric I am using was like $11 a yard before my coupon...and I needed 4 yards!
I also found a new & exciting fabric - polyester shantung. It is a faux duponi silk that is actually a washable polyester. I bought a yard and a half of it to use as trim & such on my belt, and am excited to see how it turns out! if so, that is a MUCH cheaper alternative for duponi! It has obvious right & wrong sides, and isn't quite as nice feeling as duponi - but it's really not that bad. and the color selection was FANTASTIC! they had a shade of orange that the boy would LOVE - I had to restrain myself from just buying it to buy it.
I also bought some green cording and made a chinese knotwork belt last night! i was laughing at myself because the intructions for the various knotwork patterns that I had to work off of wasn't very helpful, and I kept getting "tied up". lol. but I got a beautiful knot made and turned it into an adjustable belt for my tang piece.
anywho, tonight there will be no crafting, as I have tickets to see Wicked. (!!!)
more tomorrow!
The yellow filled in beautifully, but the red I'm a little worried about. you can see my paint streaks, and i'm concerned that they won't wash or fade out. I'm going to go in for a 2nd coat to make sure the color is bright, and hopefully I can counteract the paintlines with the 2nd coat.
last night I cut out my Tang dress out of a beautiful green cotton gauze, and I finally found my overcoat fabric at Joann's. for once - something I needed WASN'T on sale, so I was actually able to use one of those 50% off coupons they send twice a month via mail & email. It worked out well too, because the sheer fabric I am using was like $11 a yard before my coupon...and I needed 4 yards!
I also found a new & exciting fabric - polyester shantung. It is a faux duponi silk that is actually a washable polyester. I bought a yard and a half of it to use as trim & such on my belt, and am excited to see how it turns out! if so, that is a MUCH cheaper alternative for duponi! It has obvious right & wrong sides, and isn't quite as nice feeling as duponi - but it's really not that bad. and the color selection was FANTASTIC! they had a shade of orange that the boy would LOVE - I had to restrain myself from just buying it to buy it.
I also bought some green cording and made a chinese knotwork belt last night! i was laughing at myself because the intructions for the various knotwork patterns that I had to work off of wasn't very helpful, and I kept getting "tied up". lol. but I got a beautiful knot made and turned it into an adjustable belt for my tang piece.
anywho, tonight there will be no crafting, as I have tickets to see Wicked. (!!!)
more tomorrow!
Sunday, August 27, 2006
blame it on the gutta
my head is freaking pounding!
yesterday I collected myself to have everything I would need to start this silk painting project. I spent some time at kinko's blowing a small design up to about 40 inches wide by 30 inches tall. I got to use their poster scanner and printer - very exciting!
got back to Andy's to find that he was having a vehicle emergency, so I proceeded to cut & iron my silk (45 inch nap fabric by 60 inch length!), tape my design down on the floor, tape my silk on top of it, and trace my design on the silk in pencil.
all of this happened on the floor due to my lack of large table space btw.
by the time I was done with all this my knees were killing me, and I was starving! But, it was such a tedious process that I felt pretty accomplished.
today I tackled putting the frame together, stretching the silk in the frame, and getting all the gutta (resist) painted on. I'm not sure how long to let the gutta rest/set, but I'm thinking it's probably best to let it set for 24 hours.
In the process, however, I gave myself a raging headache. I believe D's exact words were "that gutta smells like cat-fuck!"
and he's absolutely correct, it smells pretty bad.
so, my process from here:
I've already promised myself that when I do smaller pieces that I will do a couple of things differently, including in investing in one of those cool embroidery stands to hold my fabric tight while painting. I think that'd save me a lot of hassle.
other projects I have to complete this week:
happy crafting friends!
yesterday I collected myself to have everything I would need to start this silk painting project. I spent some time at kinko's blowing a small design up to about 40 inches wide by 30 inches tall. I got to use their poster scanner and printer - very exciting!
got back to Andy's to find that he was having a vehicle emergency, so I proceeded to cut & iron my silk (45 inch nap fabric by 60 inch length!), tape my design down on the floor, tape my silk on top of it, and trace my design on the silk in pencil.
all of this happened on the floor due to my lack of large table space btw.
by the time I was done with all this my knees were killing me, and I was starving! But, it was such a tedious process that I felt pretty accomplished.
today I tackled putting the frame together, stretching the silk in the frame, and getting all the gutta (resist) painted on. I'm not sure how long to let the gutta rest/set, but I'm thinking it's probably best to let it set for 24 hours.
In the process, however, I gave myself a raging headache. I believe D's exact words were "that gutta smells like cat-fuck!"
and he's absolutely correct, it smells pretty bad.
so, my process from here:
- tomorrow: paint inside of main design golden yellow & outside/edges brick red
- tuesday: (after letting the paint rest for 24 hours) iron & wash entire banner
I've already promised myself that when I do smaller pieces that I will do a couple of things differently, including in investing in one of those cool embroidery stands to hold my fabric tight while painting. I think that'd save me a lot of hassle.
other projects I have to complete this week:
- new tang dynasty chinese outfit (by friday night) including:
- strapless dress
- fatbelt
- overcoat
- monkey applique's for D's new fighting tunic
happy crafting friends!
Friday, August 25, 2006
silk & circumstance
Last night I pulled out my 4 yards of habotai silk and washed it in a couple of capfuls of synthrapol - in preparation for painting silk banners this weekend.
I also traced out my design on paper, and am a bit concerned that my initial outline for the size of the banner is going to be too big. I was planning on making it a 45 inch by 60 inch horizontal rectangle. 60 inches is 5 feet...that's really big. I'm thinking of shrinking my design down to 36 inches by 50 inches, or something. I need to give myself room on the left side of the banner to stitch a loop for the pole to slide through, and on the right side of the banner to cut some strips for fringe. It's all so very complicated, and it's just not going to come together until I cut it out and trace on my design. So, i think I'm going to do that tonight, so that tomorrow's venture of painting can be it's own set of question marks.
I also traced out my design on paper, and am a bit concerned that my initial outline for the size of the banner is going to be too big. I was planning on making it a 45 inch by 60 inch horizontal rectangle. 60 inches is 5 feet...that's really big. I'm thinking of shrinking my design down to 36 inches by 50 inches, or something. I need to give myself room on the left side of the banner to stitch a loop for the pole to slide through, and on the right side of the banner to cut some strips for fringe. It's all so very complicated, and it's just not going to come together until I cut it out and trace on my design. So, i think I'm going to do that tonight, so that tomorrow's venture of painting can be it's own set of question marks.
Wednesday, August 23, 2006
pics of projects
up a little late with an upset stomach, so I figured it'd be a good time to load up pics of 3 of my complete projects from last week.
the fabric inspiration:

the hairsticks:

2. Fabric Box
I LOVED learning how to do this. This is such a simple sewing craft that, truly, anyone can do. It is just simply different geometrical shapes of fabric, sandwiched around a thick piece of double sided fusible interfacing of the same shape.
 the whole box. Isn't the fabric AWESOME!
 the inside, matching the top. as I was satin stiching the edges of the base I realized that I had fringe laying around and thought it would look really good - so I did it, and am sooo happy about the results!
 the inside of the lid - shows the contrasting fabric that is the outside of the bottom as well. such a great project!
3. My newest asian inspired dress.
this is the dress that caused me to rant about 5/8 seams. since I already went over my mental processes over this piece, I'll just glow over the pics :).
 the whole dress. the waistband turns into ties in the back - so it has the illusion of being perfectly fitted when worn, but in reality goes on much like a tunic. but it is really fun to have this big bow & fabric ribbons hanging above your butt - it is such a feminine dress.
 a close-up of the bodice, sleeve, pleating, & belt/waistband. and how freaking gorgeous is that fabric?! It is a cotton I found in the quilting section of joann's, and just couldn't stand the thought of someone just using this gorgeous print for a freaking blanket! I was worried it would be too much, too bright, too busy...
but once it's on - it just works. it's really pretty.
so - there ya go!
happy crafting!
- Chinese Hair sticks.
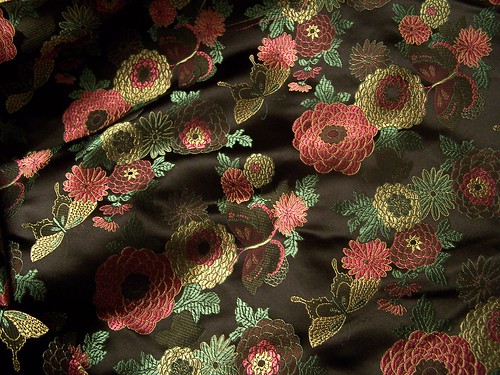
the fabric inspiration:
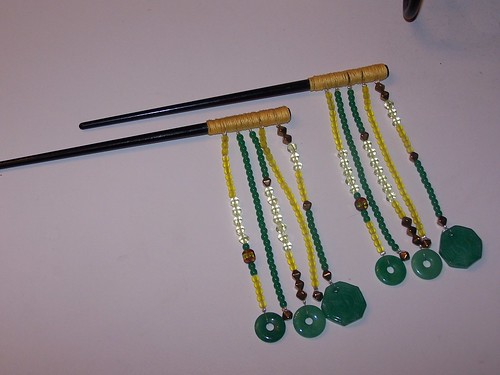
the hairsticks:
2. Fabric Box
I LOVED learning how to do this. This is such a simple sewing craft that, truly, anyone can do. It is just simply different geometrical shapes of fabric, sandwiched around a thick piece of double sided fusible interfacing of the same shape.
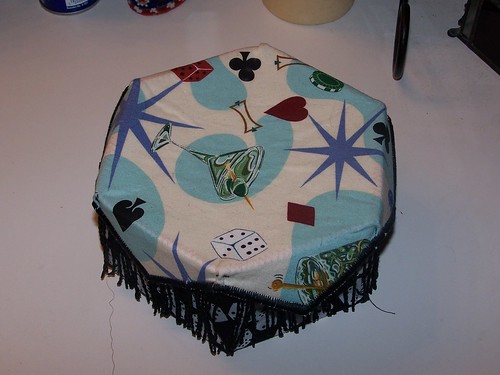 the whole box. Isn't the fabric AWESOME!
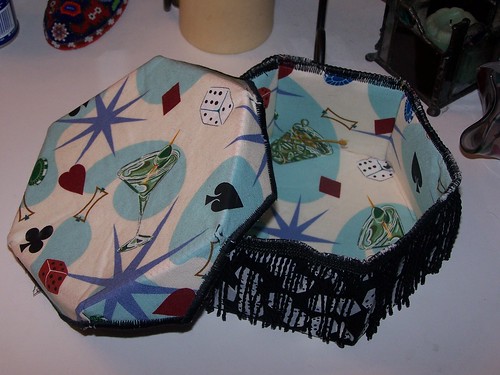 the inside, matching the top. as I was satin stiching the edges of the base I realized that I had fringe laying around and thought it would look really good - so I did it, and am sooo happy about the results!
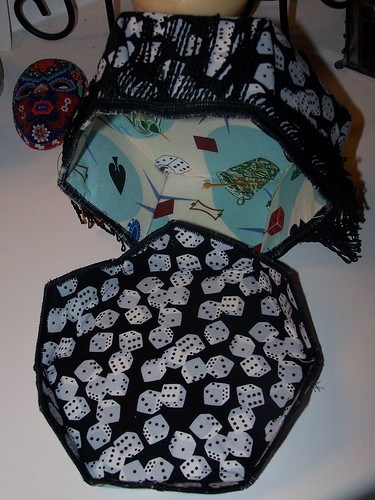 the inside of the lid - shows the contrasting fabric that is the outside of the bottom as well. such a great project!
3. My newest asian inspired dress.
this is the dress that caused me to rant about 5/8 seams. since I already went over my mental processes over this piece, I'll just glow over the pics :).
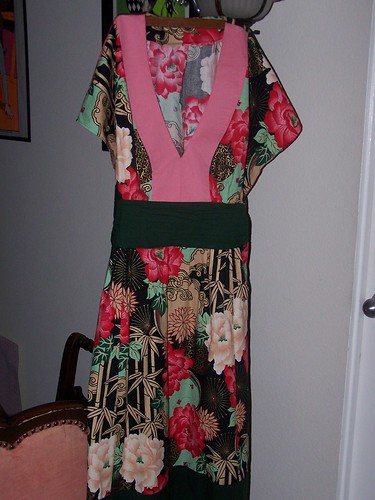 the whole dress. the waistband turns into ties in the back - so it has the illusion of being perfectly fitted when worn, but in reality goes on much like a tunic. but it is really fun to have this big bow & fabric ribbons hanging above your butt - it is such a feminine dress.
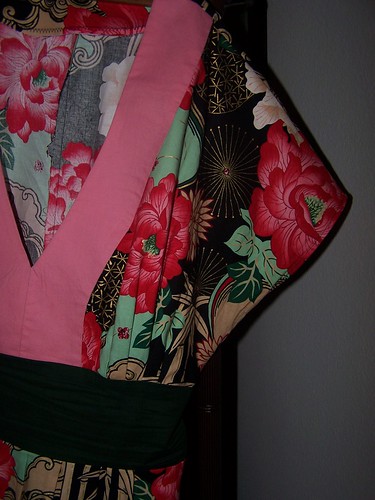 a close-up of the bodice, sleeve, pleating, & belt/waistband. and how freaking gorgeous is that fabric?! It is a cotton I found in the quilting section of joann's, and just couldn't stand the thought of someone just using this gorgeous print for a freaking blanket! I was worried it would be too much, too bright, too busy...
but once it's on - it just works. it's really pretty.
so - there ya go!
happy crafting!
Saturday, August 19, 2006
it's not easy being green
last night I got home and prepared lovely little treats for Angie & Penny for our tea party during our sewing session today. I was asked to bring scones, and while I'm sure store bought scones would have been fine - the "martha" in me couldn't do it.
I decided on making 2 different varieties:
the lemon cream made me realize that my oven runs pretty hot. and even though I took them out 15 minutes earlier than the recipe said, they were still just a tad darker and drier than I would have liked. The cranberry orange, having been baked 2nd, came out much better. But Penny had some fresh lemon curd & cream to spread accross the scones, so both were quite delicious in the end.
 In today's sewing excitement I got the kirtle for my 16th century flemish working woman's dress complete. I am really excited about this outfit. It will include a white chemise, olive green kirtle and peach open fronted overdress. really beautiful. tomorrow i'll have to make the overdress & chemise for it to be wearable, but can also make beautiful parlets & pin-on sleeves down the line for it to be really period.
I decided on making 2 different varieties:
- lemon cream
- cranberry orange
the lemon cream made me realize that my oven runs pretty hot. and even though I took them out 15 minutes earlier than the recipe said, they were still just a tad darker and drier than I would have liked. The cranberry orange, having been baked 2nd, came out much better. But Penny had some fresh lemon curd & cream to spread accross the scones, so both were quite delicious in the end.
 In today's sewing excitement I got the kirtle for my 16th century flemish working woman's dress complete. I am really excited about this outfit. It will include a white chemise, olive green kirtle and peach open fronted overdress. really beautiful. tomorrow i'll have to make the overdress & chemise for it to be wearable, but can also make beautiful parlets & pin-on sleeves down the line for it to be really period.
Wednesday, August 16, 2006
a variation from the norm
So, last night I was thinking about all the things I create that I'd like to document & show the progress of on this here blog. I realized that I do so many things for so many reasons!
- SCA - historical recreation
- sew costuming & armor
- kumihimo - the art of japanese braiding
- beading & accessories
- knitting
- silk painting (my newest venture)
- and i'd like to get into some of the scroll painting...
- burlesque
- costumes costumes costumes! EVERYTHING SHINEY!
- everyday wear
- clothing for my everyday life
- clothing for boyfriend
- clothing for work
- knitting
- beading & jewelry
- home crafts
- fabric boxes & bowls
- frame crafts & art
- pillows & decorations
- pottery
So - you see - I do a lot of shit. and I'm sure there's other things that I do that I didn't even think of! So, I'll have to keep in mind as I post things to note what the particular project is for.
Last night I finished a pair of chinese beaded hair sticks that I made to complement a Tang dynasty Chinese outfit for the upcoming crown tournament in the SCA. I found this fabulous brocade fabric that has completely inspired me to do an outfit centered around the colors of yellow & green - accented in pink & black. It sounds weird offhand, but i'll post a pic of the fabric & hairsticks & it'll all make sense!
happy crafting!
Subscribe to:
Posts (Atom)